How to Setup a Proper Python Environment on Windows
 One of the things we have to do at MarkedUp on a routine basis is test the live HTTP endpoints for our data collection APIs, and some of the data structures we upload are multipart-form POSTs that contain some complex objects (log messages with nested exceptions, etc…)
The tool we decided to use to test our API, particularly as our API changes during this early stage of our company, is the amazing Requests library in Python – which makes the process of cobbling together these complex form-encoded objects and testing them against a live HTTP endpoint bearable. I developed an in-house command line tool using Requests, argparse, and a few other built-in Python libraries to make the process of performing endpoint testing easy and repeatable for myself and the rest of the team.
However, given that we primarily work in a .NET environment and on Windows systems, my teammates sometimes get stuck figuring out how to get Python set up properly.
Since I’ve had to reinstall Python on Windows every time a new release of Windows 8 came out (including the RTM version this week) – I can say with certainty I’ve got the process down to a science.
So, without further adieu – here is how you set up a proper Python development environment on Windows.
Step 1 – Install the Python 2.7.* or 3.* Binaries from python.org
You can download the latest Python bits here from the official Python homepage.
I typically install Python 2.7.* via the Windows x86 Installer and that is what I recommend. I'd avoid the x64 installer - many of the Python libraries and compiled binaries do not play nice with 64 bit architectures. Here's a direct link to the release page for the latest version of Python as of writing this (2.7.3) - it has an X86 installer.
One bit of background for those of you unfamiliar with the Python ecosystem – Python 2.7.* and Python 3.* are totally different animals, and the majority of the Python OSS and package ecosystem still hasn’t caught up to using Python 3 yet.
There were a large number of breaking changes introduced to the Python core language runtime in 3.0 and as such it’s taken the community years to catch up. For all intents and purposes, I usually stick with Python 2.7 in all of my projects that depend on it and have never run into any issues.
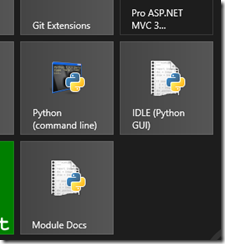
Once you’ve successfully run the Python installer, you should see the following icons appear in your start menu or if you’re using Windows 8 like me, on your home screen:
Once you have access to the Python command line and IDLE, you’re ready to move onto step 2.
Step 2 – Add the Python 2.7 Directory to your System Path Environment Variable
In order to make it so you can access Python via any command line prompt (and not just the Python-specific one), you’ll need to add the newly-installed Python 2.7 directory to your “Path” system environment variable. This makes it easier to access Python and run scripts in whatever shell you’re using to using (Command Prompt, PowerShell, and my personal favorite: Git Bash.)
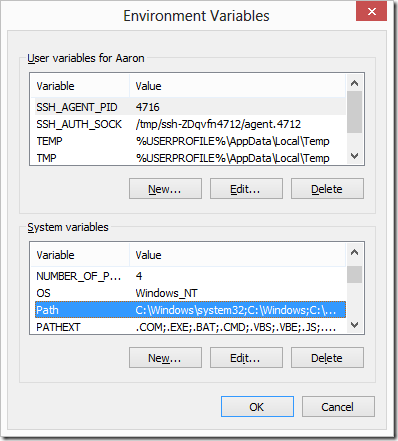
So, go to Control Panel –> System Properties –> Environment Variables and select the PATH variable from the list below:
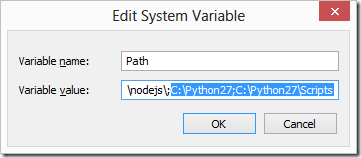
Click Edit
And append the Python path to the end of the string – the default path will be something like C:\Python27.
Also make sure you include the C:\Python27\Scripts in the Path too even if it doesn’t exist yet – this is where your package management tools, unit testing tools, and other command line-accessible Python programs will live.
With that in place, you can now start the Python interpreter on any command prompt by invoking the python command. Let’s get our package manager set up for Python.
Step 3 – Install pip to Manage Your Python Packages
There’s a couple of different options for package management in Python – pip is the one that doesn’t suck.
Pip makes it trivial for us to install Python packages, like Requests. And we’re going to have to install packages pretty often if we’re working with third party tools and libraries, so this is a must-have.
Pip has a detailed set of instructions on how to install it from source – if you don’t have the curl command on your system, just use your Git or even your web browser to download the source file mentioned in their instructions.
Step 4 – Install virtualenv to Create Local Python Environments for Your Projects
Once you have pip installed, you need to grab one last package – virtualenv.
Packages in Python are installed globally by default – which means that when a package dependency changes for one project running in a given Python environment, it changes for all of them. Not good!
virtualenv restores order to the universe by allowing you to create virtual Python environments, so you don’t have to worry about version conflicts between projects.
And now that you have pip up and running on your system, it’s trivial to install virtualenv via the command line:
C:\> pip install virtualenv
And you’re done!
Bonus – Install scaffold-py to Easily Create New Python Projects
Ok, shameless plug, but this is what I actually use for creating new Python tools and scripts for production use at MarkedUp – I wrote a pip package last Summer called scaffold-py which allows you to auto-scaffold new Python projects from the command line, just like Rails or Express projects.
From the readme:
Each project you scaffold will create the following directory structure:
/[projectname]/
/[projectname]/setup.py
/[projectname]/bin
/[projectname]/docs
/[projectname]/[projectname]
/[projectname]/[projectname]/__init__.py
/[projectname]/tests
/[projectname]/tests/__init__.py
/[projectname]/tests/[projectname]_tests.py
Both setup.py and [projectname]_tests.py are set up automatically to reference your project name as a module. The rest is up to you!
To install and use scaffold-py run this command:
C:\> pip install scaffold
C:\> python –m scaffold –p “NewProjectName”


